Showing posts with label snacks. Show all posts

Tuesday, December 10, 2013

Homemade Graham Crackers, Now These are the Real Deal


I feel like my whole life I have been living a lie.  These so-called crackers that come in a box advertising such flavors as "honey" and "cinnamon" are sooooo misleading.  I can't even properly describe the difference.  What I do know is that once you try a homemade graham cracker, you will realize that those things from that box you once thought we're graham crackers are nothing more that cinnamon and sugar sprinkled corrugated cardboard squares.  Seriously.  Your world is about to be turned upside down.  Make these, you will see!

I made these for the kids' snack day back in November.  I found they were plenty sweet, but if you want them extra dessert-y, you can sprinkle them with a mixture of cinnamon and sugar before baking.  Also, to make them fall-themed, I used a leaf cookie cutter.  You can cut them into any shape you want, including just using a knife or pizza cutter to make the traditional squares.

Homemade Graham Crackers
Makes ~24 (but it really depends on what size you cut them to)
105 cals / 4g fat / 17g carbs / 2g protein

1 1/2 cup all purpose flour
1 cup whole wheat flour
1/2 cup dark brown sugar
1 tsp baking soda
1 tsp cinnamon
3/4 tsp salt
1/2 cup cold unsalted butter
1/4 cup honey
1/4 cup plus 1 TB milk (or water)
2 tsp vanilla

1.  Combine the flours, sugar, baking soda, cinnamon, and salt in the bowl of a food processor or mixer.  Cut the butter into small cubes and add to the flour mixture, pulsing until blended in and the mixture resembles coarse corn meal.

2.  In a separate bowl, combine milk, honey, and vanilla. Pour into flour mixture and mix until dough comes together (it will still be very sticky).  Sprinkle wax paper or plastic wrap with flour, and turn dough out onto wrap.  Pat into an even disk using floured hands, wrap up tightly and chill for at least 20 minutes. 

3.  Heat oven to 350.  Line baking sheets with parchment paper.  Remove dough from fridge and roll out onto a really generously floured surface until thin (~1/8 to 1/4 inch thick).  Cut into desired shape, place on prepared baking sheet and prick with a pick or a fork to get the "traditional" holes.  Bake u tip golden, 15-18 minutes.  You can continue to re-roll and cut any of the leftover scrap dough until it is all used up.


Pin It

Tuesday, May 28, 2013

Entertaining...The Dinner Party Part II: H'ors D'ouevres

And I'm back with Part II of my little series. See here for Part I.

As I mentioned earlier, I think it is crucial to have something to nibble on before dinner. Admittedly, there is overkill on my part...I suppose if you think about it, h'ors d'ouevres aren't really necessary, and I usually make too much. But this is my favorite part of the meal. I love snacky and small-type food. In fact, way way back when, my roommate and I would often have "appetizer dinners" because we both loved those snacky things so much. But now I'm a grown up and have to eat entrees too. Sigh.....

Anyways, I wanted to keep these relatively simple since the rest of the meal was a little more involved.

The Salumi platter was all purchased from a local Italian deli.  And the other two could be mostly prepped ahead of time, so there was very little last-minute cooking involved.

Salumi Platter: Grissini, Hot Sopressata, Aged Salami, Prosciutto, Oil-Cured Olives, Spicy Green Olives, Kalmatta Olives, Castelvetrano Olives

Next up was marinated mozzarella, another quick and easy starter:

Marinated Mozzarella
Makes 8 servings
1 8 oz container fresh mozzarella pearls (or cut larger pieces into bite sizes)
1/4 cup olive oil
1/4 cup fresh herbs (I used parsley, basil, oregano, and chives....anything will work)
1 TB lemon juice
1 tsp salt
1/2 tsp pepper

1. Finely chop the herbs and combine with the olive oil, lemon juice, salt, and pepper. Drain the mozzarella and add to the herb mix. Toss to coat. You can make this up to 3 days ahead of time, store in the refrigerator. Serve at room temp.


And finally, the crostini:

Bleu Cheese Crostini with Thyme Roasted Grapes
Makes 8-12 servings

1 loaf French bread (I purchased mine)
1/4 cup olive oil
6 oz bleu cheese
4 oz cream cheese
1 TB olive oil
1 tsp white wine vinegar
~1 1/2 - 2lbs seedless red grapes
2 TB olive oil
1 large bunch thyme
1 TB honey

1. Preheat oven to 350. Discard ends of bread loaf and thinly slice on a slight diagonal. Brush each side lightly with olive oil and place in even layer on baking sheets. Bake until lightly golden, 10-15 minutes. These can be made up to 2 days ahead of time, store at room temp in an airtight container until ready to assemble.

2. Let bleu cheese and cream cheese come to room temperature. Combine cheese, 1 TB olive oil, and white wine vinegar in food processor. Process until smooth. Can be made up to 3 days ahead of time. Store in an airtight container in refrigerator until ready to assemble. (I used a ziploc bag and then just snipped a corner off to squeeze it out onto the toasts when I was assembling the crostini.)

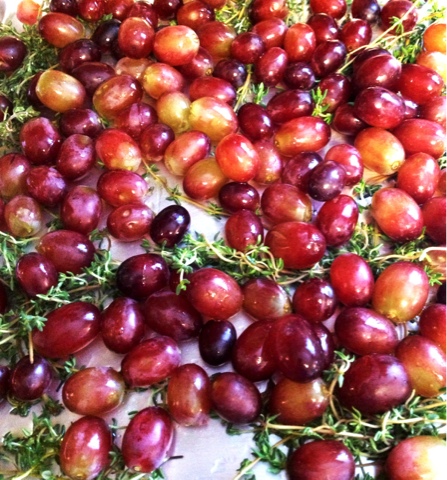
3. Preheat oven to 400. Wash and pat grapes dry. Remove from stems and toss with 2 TB olive oil. Spread sprigs of thyme out over a large baking sheet. Spread grapes over thyme and drizzle with honey. Bake until grapes are just beginning to burst, about 10-15 minutes.

4. To assemble: bring cheese spread to room temp. While grapes are roasting, spread cheese mixture over prepared crostini. Remove grapes from oven and top each crostini with a few grapes. Serve at room temperature.


Pin It

Friday, February 22, 2013

Snack Time: Toddler-Approved

Mostly on this blog I share what we eat for dinner. To switch things up a bit I thought I would share some things we typically eat throughout the rest of the day.

Here are some healthy snack ideas that the kids (and myself) love to munch on...that is, when we aren't chowing down on Cheez Its, fruit snacks, and bunny grahams.

First, our all-time favorite snack: Avocado Toast (we have this for lunch a lot as well). Toasted Ezekiel bread spread with 1/4 a mashed avocado and sprinkled with a little salt.


Next up: Behold! The power of the vegetable box! If I told my kids we were going to just snack on celery and broccoli they would probably run away screaming. But if I put a variety of veggies into a Tupperware container, set it on the table and call it our "appetizer" they inhale it like it is a plate of bacon (or cookies?). I don't know what the deal is...maybe the variety, maybe the fancy name? What I do know, is that it is pure magic. Sometimes I make a dip (1 packet ranch seasoning, 1 cup fat-free Greek yogurt, 1/2 cup low-fat cottage cheese), or we have it with hummus, or just plain. We like carrots, celery, broccoli, cherry tomatoes, sugar snap peas, bell peppers, and cucumbers.


Another household favorite is chips and salsa. I usually get the baked Tostitos, although I will branch out and buy the natural blue corn chips every now and then. L especially loves her salsa.


And of course, the dairy segment. You cant be a proper 'Sconnie without a fridge full of dairy snacks. The kids lovelovelove cottage cheese, greek yogurt, and cheese sticks.


Other items not pictured are: wasabi soy almonds (they are awesome), popcorn, cashews, pretzel rods dipped in peanut butter, and any type of fruit they can get their hands on (I like to keep a bunch washed and/or cut in the fridge so it is easy to grab).

Or...you could just go all-out and throw yourselves a fancy tea party. For those days when you are feeling really top drawer.


Pin It