Showing posts with label dessert. Show all posts

Tuesday, December 10, 2013

Homemade Graham Crackers, Now These are the Real Deal


I feel like my whole life I have been living a lie.  These so-called crackers that come in a box advertising such flavors as "honey" and "cinnamon" are sooooo misleading.  I can't even properly describe the difference.  What I do know is that once you try a homemade graham cracker, you will realize that those things from that box you once thought we're graham crackers are nothing more that cinnamon and sugar sprinkled corrugated cardboard squares.  Seriously.  Your world is about to be turned upside down.  Make these, you will see!

I made these for the kids' snack day back in November.  I found they were plenty sweet, but if you want them extra dessert-y, you can sprinkle them with a mixture of cinnamon and sugar before baking.  Also, to make them fall-themed, I used a leaf cookie cutter.  You can cut them into any shape you want, including just using a knife or pizza cutter to make the traditional squares.

Homemade Graham Crackers
Makes ~24 (but it really depends on what size you cut them to)
105 cals / 4g fat / 17g carbs / 2g protein

1 1/2 cup all purpose flour
1 cup whole wheat flour
1/2 cup dark brown sugar
1 tsp baking soda
1 tsp cinnamon
3/4 tsp salt
1/2 cup cold unsalted butter
1/4 cup honey
1/4 cup plus 1 TB milk (or water)
2 tsp vanilla

1.  Combine the flours, sugar, baking soda, cinnamon, and salt in the bowl of a food processor or mixer.  Cut the butter into small cubes and add to the flour mixture, pulsing until blended in and the mixture resembles coarse corn meal.

2.  In a separate bowl, combine milk, honey, and vanilla. Pour into flour mixture and mix until dough comes together (it will still be very sticky).  Sprinkle wax paper or plastic wrap with flour, and turn dough out onto wrap.  Pat into an even disk using floured hands, wrap up tightly and chill for at least 20 minutes. 

3.  Heat oven to 350.  Line baking sheets with parchment paper.  Remove dough from fridge and roll out onto a really generously floured surface until thin (~1/8 to 1/4 inch thick).  Cut into desired shape, place on prepared baking sheet and prick with a pick or a fork to get the "traditional" holes.  Bake u tip golden, 15-18 minutes.  You can continue to re-roll and cut any of the leftover scrap dough until it is all used up.


Pin It

Saturday, November 16, 2013

Bake It: Sugar Cookies


Iced sugar cookies are without a doubt my favorite cookie.  Or is it chocolate chip?  Ok...maybe there is a little doubt, but who can hate on a cookie.  Except oatmeal raisin.  Everyone can hate on those, blecchhhh!

Anyways, the kids' school held an ice cream social and bake sale fundraiser for the family of a 5th grade student diagnosed with Ewings-Sarcoma brain cancer.  I wanted to help out (besides of course, eating the ice cream), so I decided to bake up a batch of sugar cookies.  Perfect for the sale, and perfect for the chance to share them with you before the holidays.

The original recipe can be found here.  I don't know who Ella is, but I do know she is a sugar cookie genius.  I love this recipe for so many reasons.  It is simple, it rolls out like a dream, the dough doesn't puff or spread when baking, it doesn't change color, the texture is perfect, and of course they taste great without being too sweet.

Also, you can flavor these however you want.  I prefer almond, so that is what I am listing, but you can sub in all vanilla or lemon or orange zest or extract in its place.

Sugar Cookies
Makes about 30 average-sized cookies
106 cals / 6g fat / 11g carbs / 1g protein

1 cup butter (2 sticks), at room temp
1 cup powdered (confectioners) sugar
1 egg
1 1/2 tsp almond extract
1 tsp vanilla extract
1 tsp salt
2 1/2 cups flour

1.  Cream butter in a large bowl until lightened and fluffy.  Add powdered sugar and cream until well-mixed and fluffy, 2-5 minutes.  Add the egg, almond, and vanillas extracts and mix until well blended.  Add the flour and salt and beat until fully incorporated and dough is smooth looking, but sticky.

2.  Turn dough out onto wax paper and using floured hands, flatten into an even disk.  Wrap in wax paper and refrigerate at least 30 minutes, and up to 1 week.

3.  Heat oven to 375.  Remove dough from fridge (if dough is too cold/stiff let it sit out for 10-15 minutes and try again) and turn out onto a well-floured surface (use lots to prevent sticking), roll dough out to desired thickness (1/4 - 1/2 inch thick) and cut into desired shapes*.  Bake cookies on a greased cookie sheet 8-10 minutes, cookies should not brown.  Cool and decorate with icing,

*You can keep reforming and rolling and cutting the excess dough until you have used as much as you can.


Pin It

Wednesday, August 21, 2013

Fresh Mint Chocolate Chip Ice Cream


So today I was talking to myself (right....like I'm the only crazy one?), and I was saying "Ashli, seriously, enough blathering on about yourself and juice.  It is time to talk about real food."

But then the dilemma came...what do I share?  My latest kale concoction that even the kids willingly eat?  The best shrimp on the planet?  My casual dinner party meal?  And then I realized...DUH.  I need to share some real food...like ice cream.  Which is so real, I fully believe I could subsist on it alone. And so, I am back from droning on and on about juicing with this amazing ice cream recipe.

I made this using fresh mint, so if you are expecting the brightly green artificially flavored stuff (which..who am I kidding...is also delicious), then you need to look elsewhere.  The fresh mint gives this a pale off-white/barely tinted green color, and the mint is herbal tasting.  But it is still light, refreshing, and delicious (obvi).

Also, I am adding instructions for my new favorite way of adding chocolate to ice cream.  Feel free to skip this step and just add in some finely chopped chocolate or mini chocolate chips.

Fresh Mint Chocolate Chip Ice Cream
Makes ~1 quart

3 cups Half and Half
1 cup sugar
1 - 1 1/2 large bunch fresh mint (about 2 cups leaves roughly chopped)
1 cup heavy cream
5 egg yolks
Pinch of salt
4 oz dark or bittersweet chocolate

1.  Roughly chop the mint leaves.  Combine about 2 cups mint with half and half, sugar, and pinch of salt in heavy-bottomed sauce pan.  Heat over medium heat, stirring occasionally, until sugar is dissolved and mixture is steaming and just beginning to bubble.  Remove from heat and let mint steep for at least 30 min, up to 2 hours.  Strain mixture into a large bowl, pressing on mint to get as much moisture out as possible.  Discard mint leaves.

2.  Whisk in egg yolks and cream until fully mixed.  Return to saucepan and heat over medium heat until mixture begins to thicken slightly and coats the back of your spoon (about 7 minutes for me).  Do not let this boil.  Remove from heat and pour through a strainer back into the bowl (or get a new bowl if you aren't as lazy as me and don't mind doing dishes).  Refrigerate until cold, 2-3 hours, or overnight.

3.  Pour mixture into ice cream maker and freeze according to directions.  While ice cream is churning, finely chop chocolate and melt in the microwave, stirring every 30 seconds or so to make sure it is smooth.  Let melted chocolate sit 2-3 minutes to cool slightly (you can always re-warm if you need to). When ice cream is pretty much frozen (soft-serve consistency) using a spoon, slowly drizzle chocolate in thin lines over the top of the ice cream.  Allow to mix in, then add more to the top.  Continue until chocolate is gone (chocolate will harden and be broken into tiny bits as the ice cream mixes).  Or I guess your could just mix in the chopped chocolate or the chips...but you know, why make things easy??  Keep in the freezer.  

Or eat it all and tell your family about how good it was later.  Oh...no, that would never happen here.


Pin It

Thursday, July 18, 2013

Root Beer Cupcakes with Vanilla Ice Cream Frosting

Today, of course, is the greatest day of the year.  The day I was born.


And so to celebrate, I thought I would share this fun little cupcake recipe.  All the flavors of a rootbeer float without all the melty-mess.  Just kidding, I'm not celebrating with cupcakes (I am a pie girl).  I am celebrating by taking the kids to swim class and then the grocery store.  Be jealous.  


Rootbeer Cupcakes with Vanilla Ice Cream Frosting
Makes 24 cupcakes

2 3/4 flour
1/4 cup cocoa powder
2 tsp baking powder
1/2 tsp salt
2 cups sugar
1 cup butter, softened
4 eggs
2 TB root beer extract
1 tsp vanilla extract
2/3 cup milk

Frosting:
1/3 cup vanilla bean ice cream
2 1/2 sticks butter, softened
4 cups powdered confectioners sugar (or more or less depending on desired consistency)
2 tsp vanilla extract
1/4 tsp salt

Cherries for garnish

1.  Heat oven to 350.  Prep 24 muffin tins with liners or grease and flour. In a medium bowl, sift flour, cocoa, salt, and baking powder, set aside.  

2.  Using an electric mixer, cream the butter and sugar until fluffy.  Add the eggs, 1 at a time, beating to mix well between each addition.  Mix in rootbeer and vanilla extracts.  Add 1/3 of the flour mixture, and mix until just barely blended.  Stir in 1/2 the milk.  Add another 1/3 of flour mix, again stirring until just barely incorporated, then repeat with the last of the milk and then flour mix.  Portion into each of the muffin cups (I like to use an ice cream scoop).  Bake until a toothpick comes out clean, 20-24 minutes.  Set aside to cool.

3.  While cakes are cooling, make the frosting.  In a large mixing bowl, melt the vanilla ice cream.  Beat the melted ice cream with the butter, powdered sugar, salt, and vanilla extract until creamy and fluffy.  To make thicker frosting, add more powdered sugar.  To thin the consistency, add milk.

4.  Top each cupcake with frosting and a cherry for garnish.


Pin It

Monday, July 15, 2013

Salty Honey Pie


I have this little "if I won the lottery fantasy" where I move to an amazingly gorgeous house in my absolute favorite place in the country, New Mexico (somewhere in between Albuquerque and Santa Fe).  And just to have something to do, I open a little pie shop/cafe.  I even have a name for my imaginary store.  Part of this fantasy (and because I am just a touch crazy) means I am constantly thinking of things I would add to my menu....tasty soups, salads and sandwiches.  And of course, pie.  

The other week I went to a wine tasting that served little bites to accompany the drinks at a local family restaurant and this was the finale.  It totally knocked my socks off.  I mean, it combined three of my favorite flavors...sweet, salty, and pie.  What's not to love?

After having it, I was determined to be able to recreate it.  I found this recipe online and got to work, using B's family as my guinnea pigs.  And they loved me for it.

This one is definitely a lottery-fantasy pie shop staple.

Salty Honey Pie
Makes 1 9-inch pie

1 unbaked pie crust
1/2 cup butter, melted
3/4 cup sugar
2 TB white cornmeal
1/2 tsp salt
3/4 cup honey
2 tsp white vinegar
2 tsp vanilla extract
3 eggs
1/2 cup cream
1-2 TB flaked sea salt


1.  Heat oven to 350.  Press pie crust into a 9-inch pie plate and prick the bottom all over with a fork.  

2.  In a large bowl, using a whisk or an electric mixer, combine sugar, butter, corn meal, and salt until it is thick and paste-like.  Add the honey, vanilla, and vinegar and beat to mix well.  Beat in the eggs, one at at a time until fully combined and mix until lightened.  Mix in the cream.  Pour into the prepared pie shell and bake 45-50 minutes, until just set (center may still be a little jiggly). Let cool and then sprinkle with sea salt flakes for garnish.

Note:  my pie got pretty brown, I think covering it with foil after baking 1/2 the time would help this...if anyone makes this and tries this, let me know how it turns out.

Also, unfortunately we were all to busy stuffing our pie-holes to get a picture of this cut....you will just have to trust me that underneath that delicious brown top is a pale yellow, creamy custard.


Pin It

Monday, July 8, 2013

Mango Sorbet with Ginger and Lime


If you are looking for a cool, refreshing ice cream treat without all the guilt...meet sorbet.  Yes, they are still full of sugar, but at least we are skipping the half-and-half and heavy cream....right?  

This one is especially refreshing and awesome now (when mangoes are so cheap).  Enjoy it plain, or mix it up with a little lime seltzer (and vodka, tequila, or rum if you are so inclined) for a quick slushie.

I like to use fruit juice to make the syrup...I think it kicks the flavor up a bit.  If you can't find it or don't have it, water works perfectly fine.

I have lots more ice cream recipes to share.  B and the kids are happy.  My skinny jeans are not.

Mango Sorbet with Ginger and Lime
Makes ~1 quart

1 cup mango juice/nectar
2/3 cup sugar
5 ripe (or even overly ripe) mangoes
2 limes
1 2-inch chunk ginger (2 TB grated)

1.  Grate ginger to get 2 TB.  Combine ginger, mango juice, and sugar in saucepan over medium heat.  Bring to a boil and simmer 3-5 minutes.  Set aside to cool.

2.  Peel and cut up mango.  Place in a blender and add zest and juice from limes.  Add mango syrup and purée until smooth.  Pour mixture through a strainer to remove any large solids, then chill in refrigerator until cool.

3.  Freeze in ice cream maker according to manufacturers instructions, then store in freezer in air tight container. 


Pin It

Tuesday, July 2, 2013

Peanut Butter Chocolate Chip Ice Cream

Ahhhhhh yeah!  It's the most wonderful time of the year....ice cream season!


I love making homemade ice cream, it is so fun to experiment with different flavors.  Plus it just tastes so much better than store bought.  And what better way to kick off the season than with the much-adored combination of chocolate and peanut butter?

This ice cream is wonderful....rich, smooth, creamy, sweet with just a hint of salt.  Seriously, delicious.  And especially easy because no cooking is required.  And of course, the chocolate chips are optional....but a little chocolate makes everything better.  Right?

So, first things first, in order to make your own ice cream, you will need an ice cream maker.  I have a relatively cheap electric  Kitchen Aid one, and it does the trick just fine.  There is no sense in shelling out for the self-freezing kind unless you plan on making batch after batch of ice cream.  In which case, please invite me over so I can sample all your wares.

Also, for this ice cream, natural peanut butter won't work.  You need the regular old shelf-type stuff.

Another note...I almost always add a little booze to my ice cream.  If this freaks you out, keep in mind that the alcohol is totally optional.  I find it keeps my ice cream from getting rock hard in the freezer.  If you don't have any or want to leave it out, totally fine.  It wont affect the flavor, the only drawback is you might have to let your ice cream sit out a bit before serving.

Peanut Butter Chocolate Chip Ice Cream
Makes ~1 quart

1 cup regular peanut butter, creamy or chunky
1/2 cup sugar
pinch of salt
2 tsp vanilla
2 TB rum, optional
2 cups half-and-half
1 cup heavy cream
3/4 cup chocolate chips (I prefer the mini kind), optional

1.  In a large bowl, beat the peanut butter, sugar, salt, vanilla, rum, and 1 cup half-and-half with an electric mixer until cream and smooth.  Add the remaining half-and-half and the cream and beat until just combined.  Let sit in the fridge for 2 hours, or overnight, to chill.

2.  Pour the chilled mixture into your prepared ice cream maker and let it run per the manufacturer's instructions until frozen and creamy, like a soft-serve texture (about 15 minutes for mine).  Add he chocolate chips and continue to let it churn until they are mixed in, about 3 more minutes.  Store in an air-tight container in the freezer.


Pin It

Saturday, June 15, 2013

Banana Layer Cake with Salted Caramel Buttercream Filling, Sour Cream Frosting, and Salty Roasted Pecans


Whew.  That title is quite the mouthful.  Kind of like this cake.  There is a lot going on here.  But every bit of it is delicious and each part goes so well together.

I made this for B for his birthday last month.  He wanted banana cake.  I took his request and ran.  This one was definitely a winner.  The salty pecans and the sour cream frosting balance out the rich sweetness of the cake and the caramel filling.  This takes a lot of work to make, but it is worth it.  

Make sure you have plenty of people to share this with.


Banana Layer Cake
Makes 3 8-inch layers

2 1/2 cups cake flour
2 1/2 tsp baking powder
1/2 tsp baking soda
1/2 tsp salt
1/2 cup butter, at room temp
1 1/2 cup sugar
2 eggs, at room temp
1 tsp vanilla extract
1 cup puréed/mashed bananas (about 3-4 bananas)
1/4 cup buttermilk

1.  Heat oven to 350.  Grease and flour 3 8-inch pans.

2.  In a medium size bowl, mix together flour, baking powder, baking soda, and salt.  Set aside.  Mix buttermilk and banana together in a separate small bowl.  Set aside.

3. In a large bowl, beat the butter and sugar together with an electric mixer until light and creamy, about 5 minutes.  Beat in the eggs one at a time.  Add vanilla and continue to mix until incorporated, about 30 seconds more.

4.  Add 1/3 flour mixture to butter and bet until just incorporated.  Add 1/2 milk mixture and mix until just barely mixed.  Add 1/2 remaining flour and again beat until just mixed.  Add remaining milk, mix until just barely incorporated, then add the rest of the four and mix until just barely mixed.

5.  Divide batter between the 3 pans.  Bake until a toothpick comes out clean, about 25-30 minutes.  Allow to cool in the pans then loosen edges with a knife before turning cakes out.  Wrap tightly in plastic wrap until ready to assemble.  Can be made up to 1 day ahead of time.


Salted Caramel Italian Meringue Buttercream
Makes ~ 3 cups

1/2 cup caramel sauce (I used this recipe, you can make your own or buy it)
3 egg whites
1/4 cup water
1 cup sugar
1 tsp light corn syrup
1/2 tsp salt (or more to taste)
3/4 lb butter, cut into tablespoon sized chunks

1.  Combine the sugar, water, and corn syrup in a heavy-bottomed pan.  Put egg whites in clean bowl of a stand mixer fitted with a whisk.  Begin beating egg whites on medium speed.  While eggs are whipping, turn heat on sugar mixture to medium and cook without stirring, heating to 240 degrees.  Once the sugar reaches 240, your egg whites should be in stiff peaks, if it is taking longer for the sugar to heat, slow the mixer down so the egg whites don't break.  This should take about 6-8 minutes.

2.  When the sugar reaches 240, remove from heat.  Turn the mixer to medium-high and pour the sugar syrup very slowly in a thin stream down the side of the bowl.  Continue to mix until egg whites are cool/room temperature.  About 10 minutes.

3.  Lower the speed to medium low and begin adding the butter, 1 TB at a time, making sure each piece in fully incorporated before adding the next. If your frosting breaks apart or curdles, don't worry, just keep mixing and adding butter, it will come together and form a fluffy creamy frosting.  When all the butter has been added and the frosting has turned smooth and fluffy, slowly add the caramel sauce in a thin stream.  Allow to mix for 1 more minute.  Keep at room temp until ready to use.  Or you can make this up to 1 week ahead of time and store in the fridge.  Allow to come to room temp and whip for 2-3 minutes prior to using. 


Sour Cream Frosting
Makes ~3 cups

1 cup butter, at room temp
4 oz sour cream
1 tsp vanilla
1 1/2 - 2 lbs powdered sugar
2 TB milk

1.  In a stand mixer fitted with the paddle, cream the butter, sour cream, and vanilla until smooth.  Add the powdered sugar, and continue to beat on medium speed until frosting is smooth and creamy.  Beat in milk, if needed, to make frosting at desired consistency.  Can be made up to 1 week ahead of time.  Store in fridge.  Allow to come to room temp before using, whipping if needed.

Salty Roasted Pecans

1 cup crushed pecans
2 TB melted butter
1 tsp salt

1.  Heat oven to 350.  Toss pecans with butter and salt to coat, then spread in an even layer on a baking sheet.  Cook until oven until toasted and brown, about 10 minutes.  Allow to cool to room temperature.  Can be made up to 1 week ahead.  Store at room temp in an air tight container.

Assembly:

1.  Cut tops of each cake layer to level.  Place one layer cut-side up on a cake plate or board.  Spread with ~1 cup caramel frosting.  Top with another layer of cake and then another ~1 cup caramel frosting.  Top with last layer of cake, cut-side down, and gently press to adhere.  Cover with sour cream frosting.  Gently press roasted pecans into sides of the cake to cover.  Chill until ready to serve.


Pin It

Monday, June 10, 2013

Entertaining...The Dinner Party Part IV: Dessert

And now, the finale.  The best for last.  Butterscotch budino (fancy pudding) with caramel sauce, sea salt, and whipped topping.  


If you need to, catch up on Part I (planning) here, Part II (h'ors d'oeuvres) here, and Part III (the main course) here.

This can seem a little scary because there are 3 different parts to make.  But this really is a good choice because, if you read Part I, you will see that you can take an otherwise involved 3-part dessert and break it up over several days so it really doesn't take up too much of your time.  That is my key to being able to pull stuff like this off....especially with kids.  And the pudding really will taste better if you make it the night before.  The flavors really come together after sitting in the fridge a while.

I served this in rocks glasses (I wanted something clear to be able to see the pretty layers), but you can serve it in whatever.  And, this made 6 rather large servings.  I think you could easily do less and make 8 with the same recipe....especially if you have smaller serving dishes.

Another note, some sort of thermometer will make your life easier when making this.  A candy thermometer would be best.  I don't have one, I used my instant read meat thermometer and it worked fine.  If you have nothing, it is ok....you will just have to watch the color very carefully.

And that is the end of this meal. We had fun, and some seriously full stomachs.

What are your favorite tips or things to serve when hosting?


Butterscotch Budino with Caramel and Whipped Cream
Makes 6 large servings

Caramel Sauce
1 cup sugar
1/4 cup light corn syrup
1/4 cup water
1 cup cream
1 tsp vanilla
1/4 tsp salt

1. Place sugar in medium sized heavy-bottomed sauce pan. Add corn syrup and water. Stir gently to mix slightly.  Turn heat to medium and cook sugar without stirring, brushing down the sides of the pan with water if there are any sugar crystals on the sides to prevent burning.  Gently swirl the pan occasionally to promote even cooking.  Allow to cook until a golden amber color, about 10-12 minutes (about 340-350 degrees).  Remove from heat and slowly whisk in cream, butter, vanilla, and salt.  Stir vigorously.  Mixture may seize up, it is ok, just keep stirring and the hard candy will melt into the cream and make a smooth caramel sauce, returning to heat if needed.  Let cool to room temp, then store in fridge in airtight container.  This will keep up to 1 month in the fridge.


Butterscotch Budino
3 cups cream
1 1/2 cups milk
1 whole egg
3 egg yolks
5 TB cornstarch
1 cup plus TB dark brown sugar
1/2 cup water
2 tsp salt (kosher)
5 TB butter
3 TB scotch (or whiskey, bourbon, rum, or nothing, this is optional. But the scotch is great)

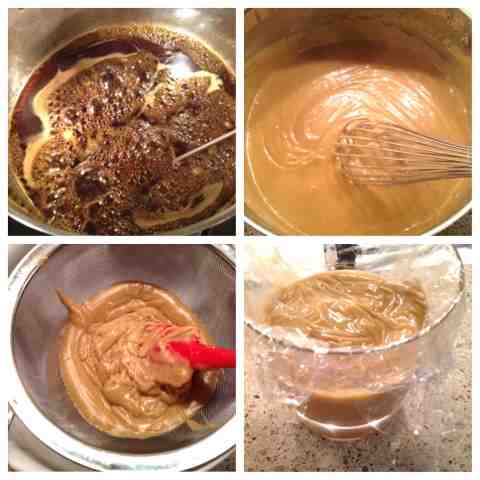
1.  Combine sugar and water in heavy-bottomed saucepan, over medium heat, stir until sugar is dissolved.  Continue to cook/boil without stirring (brushing down sides of pan with water if needed) until a dark amber color, about 350-360 degrees.

2.  While sugar is cooking, whisk egg, egg yolks, and cornstarch together in a medium sized bowl.

3.  Once sugar reaches desired color/temp, slowly and carefully stir in the cream and milk, constantly stirring to dissolve all the bits of caramel.  Bring mixture to boil, then very slowly begin adding the hot sugar mix (a little bit at a time) to the egg mixture, whisking constantly to prevent the egg from curdling.  Once about half the caramel mixture has been added to the eggs, slowly begin pouring the egg mixture into to the pan of caramel, continuing to stir constantly until mixture becomes thickened and coats the back of a spoon, about 3-5 minutes.  Remove from heat and push pudding through a fine mesh sieve into a large clean bowl to strain.  Stir in butter until smooth.  Stir in salt and scotch.  

4.  Divide pudding into serving dishes, covering the tops with plastic wrap, pushing the plastic onto the pudding to prevent skin from forming.  Store in the fridge until ready to serve.  Can be made up to 3 days in advance.  This definitely gets better after it sits in the fridge before serving, at least 12 hours.


Whipped Cream Topping
1 cup cold heavy whipping cream
3 TB sugar
1 tsp vanilla
1/4 cup sour cream

1.  Using an electric mixer, whip cream in large bowl until beginning to thicken.  Add sugar and vanilla and continue to beat until soft peaks form.  Gently fold in sour cream until smooth and glossy.  Refridgerate until ready to serve.  Can be made up to 8 hours in advance.

To Serve:
Remove puddings from fridge and allow to sit at room temp for at least 30 minutes.  (I got mine out and topped with caramel just before my friends arrived).  Top with caramel sauce and whipped cream, then add a pinch of Maldonado sea salt (or other flaky salt).


Pin It

Friday, April 26, 2013

Bake It: Great Depression Cake, now fat-free!


Depression like the economy....not your feelings. Although, if you've had a bad day, there are certainly worse things you could drown your sorrows in than a moist and delicious fat-free chocolate cake.

Story goes: this cake was developed originally during the Great Depression when things like butter, eggs, and milk were scarce and ultra-pricey. I was intrigued by its allergen-friendliness (no dairy, no soy, no eggs), but wanted to health up the original recipe a bit.

If you need a little fat or a little more sugar (my ass needs neither.   Truth is, it doesn't need cake either, but it was one of those days....), the original recipe can be found here.

I think it turned out pretty great, especially for the caloric pay off. And it was so easy to make, even a couple of 3-year olds could do it. Give it a try! I baked this in my casserole dish. Double the recipe to bake in a 13x9 pan.


Chocolate Depression Cake
Makes 12 servings
145 cals / 0g fat / 35g carbs / 2g protein

1 1/2 cup flour
3/4 cup sugar
6 TB cocoa powder
1 1/2 tsp baking powder
1/2 tsp salt
3/4 cup unsweetened applesauce
2 tsp vanilla
1 TB white vinegar
1 cup cold water

3/4 cup powdered sugar
1/4 cup cocoa powder
3 TB water
1 tsp vanilla

1. Heat oven to 350. Spray baking dish with cooking spray.

2. In a large bowl, combine flour, sugar, cocoa, salt, baking powder, mix well. Add applesauce, vinegar, vanilla, and water and stir until just combined. Pour batter into prepared pan and bake until set, about 30-35 minutes. Remove from oven to cool.

3. While cake is cooling, prepare glaze. Mix powdered sugar, cocoa, vanilla, and water together until sugar is dissolved and glaze is smooth. Pour evenly over cooled cake.


Pin It

Monday, March 25, 2013

Heaven and Hell Cake

Today is Monday. I have no meal plan. Instead, I have something better...cake!


We recently got together to celebrate my father-in-law's birthday. He requested a "chocolate, chocolate, and more chocolate" cake. I thought of this cake....I saw it online a while ago and have been wanting to try it ever since. I asked for a little leeway on the chocolate overload, and he was cool with it. So into the kitchen I went.

A concoction of Devil's Food and Angel Food cake layers filled with a rich peanut butter mousse and topped with dark chocolate ganache frosting. Be warned....this cake is rich!

I adapted the recipe from here, and I have to be honest....I followed the recipe for the angel food cake and it didn't turn out at all. It was egg-y and chewy and flattened out like crazy and just not good. I was too short on time to risk another failed attempt, so I scrapped it and sent B to the store for a box mix. And so, since I can't share that recipe in good confidence, I am skipping it. Use a box mix, or your own trusted recipe instead. I also thought four layers was just too much, so I went with 2 layers of devil's food and 1 layer of angel food. The devil's food was perfect. Although I did need to adjust the baking time. And the original recipe called for so much peanut butter filling it was overpowering. I adjusted the amounts for you below.

Heaven and Hell Cake

Devil's Food Cake
3/4 cup shortening
1 1/2 cup minus 3 TB all purpose four
3 TB cornstarch
2 tsp baking soda
1 tsp salt
1/2 tsp baking powder
1 1/2 cup coffee
3/4 cup cocoa powder
2 cup sugar
2 tsp vanilla
3 eggs

1. Heat oven to 340. Grease and flour a 10" round baking pan (at least 2 1/2 inches deep).
2. Stir together coffee and sifted cocoa powder. Mix until smooth. Set aside.
3. In a medium bowl, sift together flour, baking soda, salt, baking powder, and cornstarch.
4. In a large bowl, combine eggs, shortening, vanilla, and sugar. Beat with an electric mixer on medium heat until lightened and fluffy, about 3 minutes.
5. Add 1/2 flour mixture and beat until just combined. Add cocoa mix and beat until mixed. Add remaining flour mixture, and again stir until just combined.
6. Pour batter into prepared pan and bake until a toothpick comes clean in the center, about 45-50 minutes. Cool slightly in pan, and then turn out and cool completely on a wire rack.

Peanut Butter Mousse
2 cups creamy peanut butter
12 oz cream cheese, at room temp
1 tsp vanilla
1 1/2 cup powdered sugar
2/3 cup heavy cream, chilled

1. In a large bowl, beat cream cheese, peanut butter, powdered sugar, and vanilla, until well combined, lightened, and smooth, 3-5 minutes.
2. In a separate bowl, beat cream on high until stiff peaks form.
3. Gently fold 1/3 of whipped cream into peanut butter mixture to lighten, the fold in remaining cream until just combined. Keep refrigerated.

Chocolate Ganache Frosting
20 oz good quality semi-sweet chocolate
2 1/2 cup heavy cream

1. Finely chop chocolate and place in a medium size mixing bowl.
2. Heat cream in microwaveable safe container until just starting to simmer, about 3 minutes.
3. Pour hot cream over chopped chocolate, let sit for one minute, and then gently stir until chocolate and cream are fully combined and smooth.
4. Let chocolate mixture sit at room temp over night, or alternatively, place bowl in larger bowl filled with ice and water, stirring chocolate occasionally, to cool until solidified and thickened.
5. Using an electric mixer, whip chocolate mixture until lightened, smooth, and fluffy, about 4-5 minutes.

One angel food cake (I used a box mix), prepared according to directions, and baked in a 10" round cake pan (at least 2 1/2" deep), lined on the bottom with parchment paper (do not grease pan).

Assembly:
1. Trim devil's food cake to level, then split evenly in half. Place one layer on a cake round or plate and spread evenly with 1/2 peanut butter mousse.
2. Trim angel food cake to level and place on top of peanut butter mousse. Spread evenly with remaining half of mousse filling, then top with remaining layer of devil's food cake.
3. Chill cake at least 3 hours, then frost with ganache frosting. Keep finished cake refrigerated until ready to serve.


caaaaakkkkkeeeeee!!!


Pin It

Wednesday, February 6, 2013

Quick Bananas Foster

Who doesn't love a delicious and quick dessert? Especially one that involves ice cream, butter, and bananas....the three food groups.  No, this isn't authentic N'awlins cooking. But it is quick, easy, lightened up, and delicious. I will leave the authentic to Brennan's.

Bananas Foster Sundae
Makes 4 Servings
280 calories / 10g fat / 42g carbs / 4g protein 

2 TB butter
1/4 cup brown sugar
3 TB Rum
Dash of cinnamon
2 bananas
2 cups slow-churned vanilla ice cream (1/2 the fat)

1. Slice the bananas into 1/2 inch slices.

2. Melt the butter in a small sauté pan over medium heat. Add brown sugar and cinnamon and stir to dissolve. Stir in rum, mixture will bubble. Add banana slices and continue to cook until bananas just begin to soften, about 2 minutes. Set aside.

3. Divide ice cream among 4 bowls and top with bananas and syrup.


Pin It

Sunday, December 30, 2012

Christmas Morning Cinnamon Rolls

Another indulgence.....from-scratch cinnamon rolls, gooey, delicious, and hot out if the oven. The perfect way to start Christmas morning (or any morning really, because when could a fresh hot cinnamon roll be bad???).

These work especially well for busy mornings because you can prep them the night before, then keep them in the fridge until you are ready to bake them. And nobody needs to be the wiser. Let them think you slaved away. But really, who the heck gets up 3-4 hours ahead of time to make these fresh? I enjoy my sleep way too much for that.

Cinnamon Rolls
Makes 12

Dough:
1 cup milk, warm
2 TB sugar
2 1/4 tsp active dry yeast (1 envelope)
1/2 cup sugar
1/3 cup butter, melted
2 eggs
4 cups flour
1 tsp salt
Filling:
1/2 cup butter (1 stick)
1 cup brown sugar
1/4 tsp salt
3 TB cinnamon (I like Saigon best)
Icing:
4oz cream cheese, softened
4 TB butter, softened
1 tsp vanilla
1 1/2 cups powdered sugar

1. Make sure the milk is warm but not hot. Mix with the 2 TB sugar in the bowl of your electric mixer fitted with the dough hook, sprinkle the yeast over the top and let it sit until foamy, about 10 minutes. Mix in the sugar, melted butter, eggs, salt, and flour. Mix over medium speed until the dough is smooth, elastic, and coming off the sides of the bowl to form a ball. It will still be a little sticky.

2. Spray a large mixing bowl with cooking spray. Remove dough from mixer, kneading once or twice, and scraping to form a ball shape. Transfer to sprayed bowl, and lightly cover. Set aside in a warmer area to rise until roughly doubled in size, about 2 hours.

3. Punch dough down, and turn out onto a well floured surface. Roll it out into a rectangle until the dough is somewhere between 1/4 and 1/2 inch thick, about 10x20 in size.

4. Make filling: mix the brown sugar with the salt and cinnamon. Soften the butter until it is almost melted, but still solid form. Spread the butter over the entire surface of the dough rectangle and sprinkle the cinnamon sugar mix over the butter. Use the rolling pin to gently press the sugar into the butter. Then, starting at the top of the dough, slowly roll it toward you, getting it as tightly rolled as possible to form a giant log. Pinch the seam to seal.

5. Spay a 13x9 pan with cooking spray. Slice the dough into 12 even rounds and lay in the pan, reforming if needed. At this point, you can tightly cover and keep in the refrigerator up to 18 hours. Or you can let them sit for the second rise and bake right away.

6. Allow rolls to sit at room temperature for ~30 minutes to rise a second time. Heat oven to 375 and bake until golden brown, about 22 minutes.

7. Make icing by beating powdered sugar, cream cheese, butter, and vanilla until smooth. Spread over hot cinnamon rolls and serve.


Pin It

Monday, December 17, 2012

Bake It: Clementine Glazed Shortbread Cookies

Yes, another baking post. I know you are probably all sick of stuffing your faces with Christmas cookies at this point.  I know I am ( ok, not really).  But I thought I would share this one. Because, if you are like me, you have an abundance of clementines hanging around your fruit bowl. And it would be a shame not to butter and sugar them up a little...in the spirit of Christmas and all.

Clementine Glazed Shortbread Cookies
Makes ~24 cookies

2 cups flour
1/4 tsp salt
1/3 cup sugar
1/3 cup powdered sugar (for cookies)
1 cup butter, slightly softened
4-6 clementines
1 1/2 cup powdered sugar (for glaze)
1 TB corn syrup

1. Finely grate clementines to get 3 TB zest. Set clementines and zest aside.

2. Using an electric mixer, beat the butter, sugar, and powdered sugar together until smooth and creamy. Mix in 1 TB zest and salt. Gently stir in flour by hand until just incorporated.

3. Turn dough out onto plastic wrap and flatten into a disk. Wrap in plastic and refrigerate 1-2 hours, or until cold.

4. Heat oven to 350. Line baking sheets with parchment paper or cooking spray. Roll out dough to 1/4 inch thickness in floured surface. Use a cookie cutter or knife to cut into desired shape and place on prepared sheets. Bake 8-10 minutes until just browned. Allow to cool slightly on baking sheets then remove to wire racks (or your counter) to cool fully.

5. While cookies are cooling, prepare glaze. Juice clementines to get 1/4 cup juice. Mix powdered sugar, remaining 2 TB zest, clementine juice, and corn syrup until smooth. Spread over tops of cooled cookies. Let glaze dry, then store in air tight container.


Pin It

Saturday, October 6, 2012

Carol's Cake

I made this cake for my mother-in-law's birthday.  I think she really wanted one from her favorite bakery, but my father-in-law asked me to make it for her as a "surprise," so into the kitchen I went.

Every birthday cake for our family birthdays between my husband and his parents consists of a version of this cake, 1/2 chocolate cake, 1/2 yellow cake, filled with strawberries, and topped with whipped cream or buttercream.  Fun fact about me:  I dont like strawberries (unless they are fresh and whole).  I hate macerated berries, strawberry flavored things, or that weird strawberry gel/syrup thing that comes in cakes.  Yeah. So in-law cake time and me? We don't mix.

For my version of this cake, I used my favorite chocolate cake recipe (adapted from epicurious), my favorite yellow cake recipe from here, and a strawberries and cream mousse filling instead of berries in gel (taking some artistic liberty here).  I frosted it using my hands-down favorite buttercream recipe, starring my surprise secret ingredient (which I will talk about in a separate post). Also, the recipes below make 4 cake layers, but I only ended up using 3. 4 was going to be precariously tall, and since we were traveling, I didn't want a cake disaster.

The kids chose pink flowers, so I decided to attempt the roses cake I have seen all over pinterest. It came out all right, but I think a pointed star tip instead of a rounded one would have made better flowers. Next time!

Oh, and I am not including nutritional info for this....it is birthday cake.  Live a little!

Chocolate Cake
This recipe makes 2 small 8" round layers.  For a full cake or a larger pan, I would double it.

1 oz good quality dark chocolate, chopped up a little
1/2 cup hot coffee
1 cup flour
1 cup sugar
1/2 cup cocoa powder, not Dutch-processed
1 tsp baking soda
1/4 tsp baking powder
1/4 tsp salt
1 egg
1/4 cup vegetable oil
1/2 cup buttermilk
1/2 tsp vanilla

Pre-heat oven to 300.  Grease 2 6" round pans (I use Pam), then cover the bottom in parchment paper and grease the paper and pans.  Place the chocolate in a small bowl and pour the coffee over the top to melt, stirring to mix.  In a separate bow, mix and sift the four, sugar, cocoa powder, baking soda, baking powder, and salt together, set aside.  In a large bowl beat the crap out of the egg (this step is important, you want to really break up the proteins) until it is pale yellow and frothy, about 4-5 minutes.  Add the oil, buttermilk, coffee mixture, and vanilla and blend well.  Add flour mix, blending until just incorporated (don't overmix!).  Split the batter between the two pans, give them a couple taps on the counter to reduce the air bubbles, and bake in the center of your oven until done, 40 - 50 minutes.

Cool the cakes slightly in the pan, then turn them out, remove the paper, and allow them to cool fully.  Once cool, you can wrap them tightly in plastic until you are ready to assemble.  I always bake my cakes at least one day ahead of assembling them, I think it gives them time to "set" or something, it makes them easier to fill and frost.

Yellow Cake
This recipe makes 2 small 8" round layers.  For a full cake or a larger pan, I would double it.

2 cups plus 1 TB cake flour
1/4 cup powdered milk
1 tsp baking powder
1/2 tsp baking soda
1/2 tsp salt
1/2 cup butter, room temp
1 whole egg plus 2 egg yolks
1 cup sugar
1 cup buttermilk
1 tsp vanilla

Pre-heat oven to 350. Grease 2 6" pans, line the bottoms with parchment, and grease again. Mix the flour, powdered milk, baking powder, baking soda, and salt in a bowl and set aside. In a large bowl, beat the butter and sugar until light and fluffy, about 5 minutes. Add the egg, yolks, and vanilla, and beat well. Add 1/3 of. The flour mixture and mix until just barely combined, add 1/2 the butter milk, and mix to just barely combine. Repeat these additions, ending with the dry ingredients. Split between the two pans, tap the pans a few times to eliminate air bubbles, and bake until done, ~20-35 minutes.

Cool slightly in pans, then turn out and remove papers to cool fully. Once cool, tightly wrap in plastic wrap until you are ready to assemble.

This recipe makes 2 small 6" round layers. For a full cake or a larger pan, I would double it.

Strawberry Cream Filling
This will make a lot. You can probably get away with halving the recipe, or you can just eat the leftovers on top of waffles or pancakes, or with a spoon.

4 cups strawberries, hulled and crushed
1 cup sugar
1 TB unflavored gelatin
2 TB cold water
3 TB boiling water
1 1/2 pint heavy whipping cream
1/2 tsp vanilla

Mix the sugar and crushed strawberries together and set aside. Soften the gelatin in cold water and then add boiling water, stirring until gelatin is dissolved. Stir gelatin mix into strawberries and set aside to cool. Beat the whipping cream until thick and small peaks hold, stir in vanilla. Fold in strawberry mixture, cover tightly, and refrigerate until set, at least 8 hours.

To assemble:
Use a large serrated knife to level the cake layers, if needed. Place one of the cake layers on a cake board or serving platter, pipe a thick circle of frosting around the outer edge of the cake layer and cover the inside of the circle with filling. Top with another cake layer (alternating flavors) and repeat filling. Place last layer upside down so top of cake is smooth and flat. Frost and decorate however you want.

The completed cake should be refrigerated due to the cream filling.


Pin It

Thursday, October 4, 2012

Quick Fix: Thyme Roasted Pears with Bleu Cheese

I based this quick side/dessert/appetizer (depending on your mood) off one of my favorite salads. This is quick and easy to make, and looks a little fancy if you need to impress but don't want to put forth any effort. I used reduced-fat bleu cheese, but regular bleu or Gorgonzola would work great also.


Thyme Roasted Pears with Bleu Cheese
Serves 4, 1/2 pear per serving
100 cals / 1g fat /  16g carbs / 2g protein

2 red pears (or any kind of pear you want), cut in half and core and stem line removed
4 TB reduced-fat crumbled bleu cheese
2 tsp honey
1 tsp fresh thyme leaves, chopped
1 tsp cracked black pepper
1 bunch thyme sprigs

Pre-heat oven to 415.  Fill center of each pear half with 1 tablespoon crumbled bleu cheese.  Sprinkle each with 1/4 teaspoon thyme leaves and 1/4 tsp fresh cracked pepper.  Drizzle 1/2 teaspoon honey over top of each pear.  Place on baking sheet and surround with additional bunches of thyme.  Bake for ~15 minutes, until cheese and pears are soft and slightly browned.


Pin It