Tuesday, December 10, 2013

Homemade Graham Crackers, Now These are the Real Deal


I feel like my whole life I have been living a lie.  These so-called crackers that come in a box advertising such flavors as "honey" and "cinnamon" are sooooo misleading.  I can't even properly describe the difference.  What I do know is that once you try a homemade graham cracker, you will realize that those things from that box you once thought we're graham crackers are nothing more that cinnamon and sugar sprinkled corrugated cardboard squares.  Seriously.  Your world is about to be turned upside down.  Make these, you will see!

I made these for the kids' snack day back in November.  I found they were plenty sweet, but if you want them extra dessert-y, you can sprinkle them with a mixture of cinnamon and sugar before baking.  Also, to make them fall-themed, I used a leaf cookie cutter.  You can cut them into any shape you want, including just using a knife or pizza cutter to make the traditional squares.

Homemade Graham Crackers
Makes ~24 (but it really depends on what size you cut them to)
105 cals / 4g fat / 17g carbs / 2g protein

1 1/2 cup all purpose flour
1 cup whole wheat flour
1/2 cup dark brown sugar
1 tsp baking soda
1 tsp cinnamon
3/4 tsp salt
1/2 cup cold unsalted butter
1/4 cup honey
1/4 cup plus 1 TB milk (or water)
2 tsp vanilla

1.  Combine the flours, sugar, baking soda, cinnamon, and salt in the bowl of a food processor or mixer.  Cut the butter into small cubes and add to the flour mixture, pulsing until blended in and the mixture resembles coarse corn meal.

2.  In a separate bowl, combine milk, honey, and vanilla. Pour into flour mixture and mix until dough comes together (it will still be very sticky).  Sprinkle wax paper or plastic wrap with flour, and turn dough out onto wrap.  Pat into an even disk using floured hands, wrap up tightly and chill for at least 20 minutes. 

3.  Heat oven to 350.  Line baking sheets with parchment paper.  Remove dough from fridge and roll out onto a really generously floured surface until thin (~1/8 to 1/4 inch thick).  Cut into desired shape, place on prepared baking sheet and prick with a pick or a fork to get the "traditional" holes.  Bake u tip golden, 15-18 minutes.  You can continue to re-roll and cut any of the leftover scrap dough until it is all used up.


Pin It

Tuesday, December 3, 2013

Oatmeal Chocolate Chip Pancakes


Breakfast is so awesome.  It is the only meal where it is socially acceptable to eat dessert as your meal.  And also, it is the meal where bacon is found the most.  What's not to love?

These pancakes started out as a copy of some pancakes at one of my favorite breakfast spots (that is now closed...sad!).  The original version is actually cranberry oatmeal pancakes with a honey pecan syrup.  They are also are also quite delicious, and I will probably share that version at some point.  But I was feeling the need for something chocolate-ey, since wine is not allowed at breakfast like I do at pretty much any given time of the day.

These are somewhat similar to my Chocolate Chip Cookie Pancakes, although not quite as sweet and cookie-tasting (just in case you were looking to tone down that whole dessert for breakfast plan).

Oatmeal Chocolate Chip Pancakes
Makes ~8 pancakes
170 cal / 5g fat / 28g carbs / 5g protein

1 cup flour
1 cup old fashioned rolled oats
3 TB brown sugar
2 tsp baking powder
1/2 tsp cinnamon
1/2 tsp salt
1 cup milk
1 egg
2 TB melted butter
2 tsp vanilla
1/2 cup chocolate chips

1.  In a food processor, combine flour, 1/2 cup of oats, brown sugar, baking powder, cinnamon, and salt.  Pulse until mixed and oats are powdery.  Place in a large bowl.  Add remaining 1/2 cup oats and stir.

2.  In a separate smaller bowl, beat milk, egg, melted butter, and vanilla until combined.  Add to te dry mixture and stir until just mixed.  

3. Heat a pan or griddle over medium heat, and spray with cooking spray or lightly oil or butter. Pour 1/4 cup batter into circles and sprinkle with chocolate chips.  Cook until edges bubble, then flip pancakes and cook until other side is browned.


Pin It

Saturday, November 23, 2013

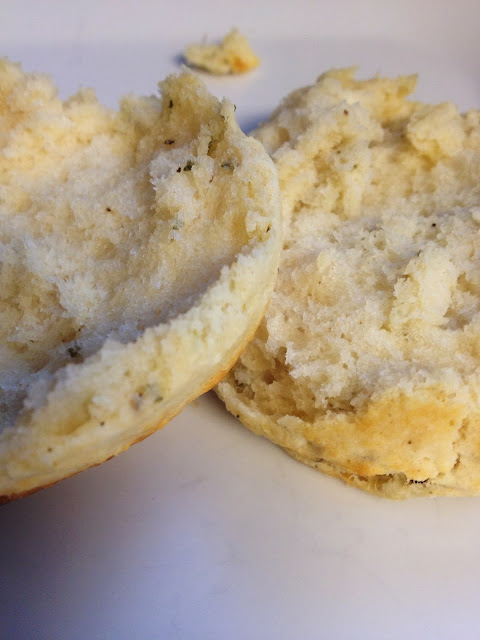
Biscuits So Good Your Great Grandma Will Be Jealous


I am fortunate to have a history of long-living women in my family.  In fact, my Great Grandma passed away just a few years ago.  It makes me feel like time is on my side, you know?  I am also fortunate that I was able to experience her cooking.  You see, Flora came from a tiny town in the middle-of-nowhere Tennessee.  And as was the case with most southern women, she prided herself on her cooking.  And in her case, that pride was justified.  Her chicken and dumplings and chocolate pies are some best things I have ever eaten, and I have never ever tasted their equals.

Her biscuits were also amazing, but I am proud to say that not only have I equaled them, I am pretty sure I have surpassed them.  That probably has Flora squirming in the grave, but you know what?  She was also kind of a bitch, so....oh well.


A few notes about biscuits...you have 3 options when it comes to fat: butter, shortening, and lard.  All butter...the taste is great, but in my esteemed biscuit opinion, the texture is off. They are too dense and heavy.  All shortening...the texture is perfect, but then the flavor suffers.  My resolution...lard, with a little butter too for the flavor.  If lard freaks you out, sub with shortening, but you really should give it a go.

Also...the less you handle the dough, the fluffier these will be.  After cutting the first time, I will re-form the dough and cut more, but these second-pass biscuits will not be quite as tender as the first.  And skip the third pass....those guys will be worthless.  Or you could just avoid this problem by going rogue and making square biscuits.  Also, make sure everything is really cold, it really does make a difference.

Sometimes I like to add in some flavor crystals, just to kick things up a notch.  In this case I added lots of cracked black pepper and fresh rosemary.  Other ideas are sliced green onions and cheddar cheese, blue cheese, lemon zest and thyme, or just plain old fashioned awesome biscuits.

Better Than Flora's Buttermilk Biscuits

2 cups flour (all-purpose or cake flour)
1 TB baking powder
1/4 tsp baking soda
1 tsp salt
3 TB lard
2 TB I salted butter (plus more to melt and brush on the top)
1 cup cold buttermilk

1.  Heat oven to 450.  Cut butter and lard into small chunks and put them in the freezer to make sure they are really really cold.  Combine the flour, baking powder, baking soda, and salt in a large mixing bowl.  Add butter and shortening, and using a fork and a knife, cut them into the flour until incorporated into the flour and the mixture looks like tiny crumbs or gravel.  Add buttermilk and stir until just combined.

2.  Turn the dough out onto a really well-floured surface and roll until about 1/2 - 1 inches thick, fold the dough in half on top of itself and press/roll it lightly so it sticks together.  This dough is going to be really sticky, so be generous with the flour.  Cut dough into rounds using a floured biscuit cutter or a glass (don't twist the cutter, push is straight down and pull it straight up).  Or use a sharp knife and cut the dough into squares.  Repeat if desired with any excess dough.

3.  Place biscuits onto ungreased baking sheet. Lightly brush the tops with melted butter.  Bake until the tops are golden brown, ~18 minutes.


Pin It

Saturday, November 16, 2013

Bake It: Sugar Cookies


Iced sugar cookies are without a doubt my favorite cookie.  Or is it chocolate chip?  Ok...maybe there is a little doubt, but who can hate on a cookie.  Except oatmeal raisin.  Everyone can hate on those, blecchhhh!

Anyways, the kids' school held an ice cream social and bake sale fundraiser for the family of a 5th grade student diagnosed with Ewings-Sarcoma brain cancer.  I wanted to help out (besides of course, eating the ice cream), so I decided to bake up a batch of sugar cookies.  Perfect for the sale, and perfect for the chance to share them with you before the holidays.

The original recipe can be found here.  I don't know who Ella is, but I do know she is a sugar cookie genius.  I love this recipe for so many reasons.  It is simple, it rolls out like a dream, the dough doesn't puff or spread when baking, it doesn't change color, the texture is perfect, and of course they taste great without being too sweet.

Also, you can flavor these however you want.  I prefer almond, so that is what I am listing, but you can sub in all vanilla or lemon or orange zest or extract in its place.

Sugar Cookies
Makes about 30 average-sized cookies
106 cals / 6g fat / 11g carbs / 1g protein

1 cup butter (2 sticks), at room temp
1 cup powdered (confectioners) sugar
1 egg
1 1/2 tsp almond extract
1 tsp vanilla extract
1 tsp salt
2 1/2 cups flour

1.  Cream butter in a large bowl until lightened and fluffy.  Add powdered sugar and cream until well-mixed and fluffy, 2-5 minutes.  Add the egg, almond, and vanillas extracts and mix until well blended.  Add the flour and salt and beat until fully incorporated and dough is smooth looking, but sticky.

2.  Turn dough out onto wax paper and using floured hands, flatten into an even disk.  Wrap in wax paper and refrigerate at least 30 minutes, and up to 1 week.

3.  Heat oven to 375.  Remove dough from fridge (if dough is too cold/stiff let it sit out for 10-15 minutes and try again) and turn out onto a well-floured surface (use lots to prevent sticking), roll dough out to desired thickness (1/4 - 1/2 inch thick) and cut into desired shapes*.  Bake cookies on a greased cookie sheet 8-10 minutes, cookies should not brown.  Cool and decorate with icing,

*You can keep reforming and rolling and cutting the excess dough until you have used as much as you can.


Pin It

Monday, November 11, 2013

Roasted Vegetable Stromboli

Don't be scared...stromboli is just a fancy-pants eye-talian word for hot pocket.  Hot Pocket.  There, let that sink in.  Feel better?


Seriously, these things are easy-peasy to make, super yummy, and popular with the kiddos.  And they are a great way to use up some of that homemade pizza dough (in case you are sick of pizza).  If you don't have homemade dough on hand, or just don't feel like making it, it's cool.  Just buy the frozen version or the bag mix (powder, like a cake mix).  But stay away from the stuff in the can...it doesn't stretch as well. 

Making stromboli is super easy, and can be customized to whatever fillings suit your fancy.  In this version, I used a mix of roasted veggies and a little bit of cheese, but seriously, just throw together whatever you like.  I like to serve them with a little marinara on the side for dipping, but again, it's whatever suits you.

Roasted Vegetable Stromboli
Makes 6 servings
212 cals / 8g fat / 23g carbs / 10g protein

1 pizza dough, thawed if frozen (I use this one)
2 heads broccoli (or about 3 cups florets)
2 zucchini
1 red pepper
1 small red onion
1 TB olive oil
1 1/2 tsp salt
1 tsp pepper
1 cup low-fat shredded mozzarella cheese
2 TB grated parmesan

1.  Pre-heat oven to 400.  Dice the red onion, zucchini, and red pepper, cut the broccoli into bite-sized floret pieces.

2.  Toss veggies with olive oil, salt, and pepper.  Lay in a single layer on a large baking sheet and roast until softened and slightly browned, stirring once about half-way through, 30-45 minutes.  Remove from oven and set aside to cool slightly.

3.  Roll dough out on a lightly floured surface into a large rectangle, about 9x15 and about 1/4 inch thick. Spread mozzarella down the center and top with roasted veggies, leaving 2-3 inches of dough on each side.  Close dough up however you want (I tried to do a fancy braid-thing...it didn't turn out so pretty, but pictures are below...you get the idea), pinching any seams to seal, and cutting vents on top if needed.  Sprinkle top with parmesan, transfer to a baking sheet coated with cooking spray or parchment paper and bake until golden brown, about 15-20 minutes.


Pin It

Monday, November 4, 2013

Crock Pot Ham and Beans (and Meal Plan Moday too!)

I've never been especially boastful or cocky, but I don't think I am out of line when I say that I seriously make the best ham and beans ever.  I mean, I always thought they were gross....at least until I gave it a go.  Now I think they are delicious, and so warm and hearty.  And I want to share them with you, because I am so kind and giving (and fine....maybe a liiiiittttle boastful, but whatever).

But first, meal plan Monday is here.  My plan for this week includes:
 - Shrimp and Grits, Roasted Broccoli
 - Healthified Swedish Meatballs, Egg Noodles, Carrots, Cranberries
 - Chicken Tostadas, Black Bean Salad
 - White Bean Ragout, Homemade Ciabatta Toasts, Endive Salad

There are 3 new recipes for me on the menu for this week.  Super exciting stuff, when you don't really do much that is exciting.

Now, back to the ham and beans....a few notes:
  • I have used both navy beans and great white northern beans.  I like the navy beans for the smaller size, but they take longer to cook and aren't as creamy as the northerns.  I would stick with great white northern beans.
  • Some people like to use ham hocks, but I prefer a ham steak (sacrilege, I know), with a smoked neck bone thrown in for flavor.  Smoked neck bones are usually easy to find at the store.  I keep mine in the freezer, and just toss one in the crock pot with the beans.  No need to thaw.
  • These go great with cornbread.  I like to try and keep it low-fat, but I like it all.
  • Do the overnight soak for the beans.  Don't do the quick-soak method.  I don't trust it.
  • I like mine more stew-like than soup-like.  If you want it like soup, just add more broth at the end.
  • Don't be chintzy with the salt.  Seasoning is key.


Crock Pot Ham and Beans
Makes 8 servings
195 cals / 2g fat / 42g carbs / 23g protein

1 lb Great White Northern beans, dry
1 1-lb ham steak, bone-in
1 smoked pork neck bone
2 small onions
4 cloves garlic
2 TB fresh thyme leaves
2 TB brown sugar
2 bay leaves
1/2 tsp nutmeg
1/2 tsp ground cloves
3 cups chicken broth
2 cups water
1/2 tsp salt (or more)
Pepper

1.  The night before you are going to make these, pick through your beans and throw out any super shriveled beans or rocks.  Rinse the beans and place them in a large bowl, covering them with about 6 cups of cold water.  Let the beans sit out and soak overnight, 8-12 hours.

2.  The next morning, drain and rinse the beans.  Place them in your crock pot.  Chop the onion, garlic, and thyme leaves, and add those to the beans.  

3.  Cube the ham steak, removing fat where you can, and add the cubed ham, along with the round bone to the beans.  Add the smoked bone, brown sugar, bay leaves, nutmeg, cloves, broth, water, salt and pepper and stir.  Cook on low for at least 8 hours.  Remove the bones and the bay leaves, season if needed, and serve.

Pin It

Monday, October 28, 2013

No-Fail Homemade Simple Pizza Dough

With "Spooky Pizza Day" (a.k.a. Halloween) quickly approaching, I thought I would share my favorite recipe for homemade pizza dough.  If you haven't tried making your own crust, you really should.  the flavor and the texture is so different from what you can get pre-made.  The dough itself is easy enough to make, but even better is the fact that you can make it ahead of time, and either freeze it for later or keep in the fridge for up to a week.  It makes those last-minute dinners a snap.  Also, I strongly strongly recommend you go with the bread flour (or even 00 if you have it).  The extra gluten is what makes this dough a no-fail one.


The nutritional info is for the entire recipe.

No-Fail Simple Pizza Dough
Makes 2 thinner crust pizzas or 1 thick crust pizza, about 14" each
1015 cals / 13.5g fat / 180g carbs / 32g protein

3/4 cup warm (not hot) water
2 1/2 tsp active dry yeast
1 tsp sugar
2 cups bread flour (plus more for dusting)
1 TB olive oil
1 tsp salt

1.  In the bowl of a stand mixed fitted with a dough hook, combine the water, yeast, and sugar.  Let sit until foamy (about 5-10 mites).  Of just use a regular bowl if you are doing this by hand.

2.  Add the flour, oil, and salt.  Mix until the dough pulls away from the sides and forms a ball.  Turn out onto a lightly floured surface and knead a few times.  Form into a ball and place in an oiled bowl, turning to coat the dough with oil.  Cover with plastic and let the dough rise in a warm place for 1-2 hours, until doubled in size.

3.  Divide dough in half, kneading each half into smooth balls with floured hands.  Roll out to desired thickness, and cook as desired.  Or...cover tightly with plastic wrap and store in the fridge or freeze until ready to use.


Pin It

Wednesday, October 23, 2013

Kale and Sweet Potato Salad(?)


I never know what to call these things...I mean, it is mostly comprised of greens and there is a dressing, so I lean towards salad, but then it is warm and all cooked together...so sauté?  casserole?  Who knows?

Seriously...does anyone know?  Ugh, first-world problems.

 
Anyways, the idea for this dinner was lifted from my Family Circle magazine (yes, I am 80 years old).  I served it as a main dish for a vegetarian night, but it would be good as a side as well.  

And when you get your kale, please buy the bunches...don't get that bag of pre-chopped stuff, it makes it impossible to remove the tough ribs.

Kale and Sweet Potato Salad with Mustard Seed Dressing
Serves 4
200 cals / 5g fat / 39g carbs / 5g protein

1-2 bunches kale (depends on how much greenery you want)
2 sweet potatoes
1 apple
1 red onion
1 TB plus 1/2 tsp olive oil
2 TB mustard seeds
1/4 cup apple cider vinegar
2 TB sugar
salt and pepper to taste 

1. Combine 1 TB olive oil, apple cider vinegar, and sugar in a small saucepan.  Bring to a simmer, add the mustard seeds.  Simmer for 2 minutes, then set aside, allowing to steep for at least 10 minutes.

2.  Peel and chop the sweet potatoes into 1/2 to 1 inch cubes.  Heat 1/2 tsp olive oil in large sauté pan over medium heat, and cook sweet potatoes until softened, about 20 minutes.

3.  While potatoes are coking, remove the stems and center ribs from the kale leaves, tear or chop into bite-sized pieces.  Quarter and thinly slice the red onion.  Chop the apple into 1/2 inch pieces.  When potatoes are almost done (after 15-20 minutes) add the onion and apple, cooking until slightly softened, about 5 minutes.  Then add the kale and cook until softened and beginning to wilt. And sweet potatoes are totally cooked through, about 5 minutes more.  Toss with the prepared dressing and serve warm or at room temp.


Pin It

Monday, October 21, 2013

Meal Plan Monday and Fall Entertaining

Leaves are falling, the temperature is dropping, and Christmas decorations are in the stores.  All the signs that Halloween is upon us.  Now is the perfect time to start thinking about those Halloween parties, get togethers, or even quiet nights in.  I thought I would share some of my favorite things in case you are still in need of ideas.

Of course, my favorite is this Autumn Spiced Rum Punch.  If you need an adult beverage, make this one it.  It is perfection.

I talked about my favorite Halloween traditions here...and without a doubt, we all look forward to spooooooky pizzas.  A simple and fun meal that all ages can enjoy (B and I were enjoying these looong before the kids came along).  Do it.


And then there were these cute treats I made for the kids school party last year, marshmallows on sticks dipped and decorated in colored white chocolate, pretzel rods dipped in the same with black licorice nails, and juice box mummies, simple wrapped in white trainer tape with googley eyes glued on.


Now, on to the less fun stuff.  What's for dinner....

 - Ham and Beans, Low-Fat Cornbread
 - Spiced Pork Chops, Mashed Sweet Potatoes, Roasted Balsamic Brussels Sprouts
 - Slow Cooker Pot Roast, Mashed Potatoes
Pin It

Wednesday, October 16, 2013

Hello...Is This Thing On??

Please forgive me for the looooonnnggg absence.  Consider it a mix of me needing a break and just being lazy.  Oh and on vacation.

I was fortunate to be able to join B on his work trip, meeting up in Germany then heading to Prague.  It was awesome.  I am also extremely lucky to have a mom who is willing and able to come and watch the kiddos while I go off, gallivanting around the globe (thanks Mommy!).

Germany was fun, the people are nice and the food is delicious.  As was the beer....

Look at me, enjoying this authentic German beer.

Prague was gorgeous and full of friendly people and old world charm.  And I was full of wine and foie gras.


Needless to say, I have been on vacation with my eating habits and my waistline has paid dearly for it.  I look forward to getting back to some healthier and cleaner eating (and being able to fit into my pants again!).


Pin It

Monday, September 9, 2013

Meal Plan Monday and What To Do With Cheap Summer Produce

Whaaaaa-Laaaah!  It is back in effect, Meal Plan Monday!

Since the kids are back in school and back in activities, I need to get back in my game of planning and organizing, so welcome to the re-appearance of my weekly meal plans.  Feel free to share yours below, I love seeing what people are eating.

This week was a tough one, coming off vacation I was feeling a little un-inspired on what to make, this is where "The List" comes in handy.  I keep notes on my iPad of different recipe or meal ideas I have to try, plus a list of meals I have made in the past.  If I am in a "what should I make" rut, I consult the list and just pick items from there.  Done and done.

This weeks menu includes:

 - Pan-Seared Chicken with Pears and Bleu Cheese, Bleu Cheese Creamed Spinach
 - Hawaiian Chicken Meatballs, Sugar Snap Peas, Brown Rice
 - Tropical Black Bean-Stuffed Sweet Potatoes
 - Grilled Thai Peanut Chicken, Roasted Curry Cauliflower, Asian Cucumber Salad
 - Homemade Rosemary Black Pepper Biscuits, Slow Roasted Cherry Tomatoes, Fried Eggs

This is also such a great time for produce, everything is being harvested and is super cheap.  Take advantage of these sales and put up your own produce for the winter.  You can jar or freeze most of it, but I prefer to freeze it, just because it is easier and quicker.  Last week I froze 40 ears of corn, 40 limes, and 20 peaches.  These were the best sales I could find....have you seen anything else out there?

The limes are easy and will save you a fortune in the future.  Mine were on sale for $0.10 each, which is a steal compared to the usual $1.00 each or more.  I simply juiced them all, then poured the juice into ice cube trays (left over from baby food makin' days).  Froze them overnight, them popped them into freezer bags.  Each cube is approximately 2 TB of juice, and I got about 6 cups of juice total from the 40 limes.  Do this.  Especially because fall is coming, and you will need lots of fresh juice for your Autumn Spiced Rum Punch.  Ahhhhhhhh yeah!


Corn and peach take a little bit more work.  For the corn, you shuck it and then blanch it (about 3-4 minutes in boiling water, then ~4 minutes submerged in ice water), then cut the kernels off.  I use a Bundt pan to hold the ear in place and catch the kernels.  Then pop the kernels into freezer bags and you are done.


For peaches, cut a small "X" into the bottom, then blanch them for ~2 minutes in boiling water and 3-4 minutes in ice water.  The skin will peel right off, then you can cut them in half, remove the pits, and slice them.  Peaches do need to be treated with a preservative to keep the color (unless you want to freeze them in water or syrup...ummm, no), so I mix the juice from 1 lemon with 4 cups of water, then just toss the peach slices into the water, swish them around a little bit, and remove.  You can freeze them in bags like this, or what I like to do is spread them out on cookie sheets and freeze the slices overnight and them pop the frozen slices into bags.  I think this makes them easier to use for yogurt or smoothies, or frozen bellinis (yum!).


Pin It

Sunday, September 8, 2013

And I'm Back.....

Sorry for the long absence.  I was on vacation with the family.  It's a weird thing, stepping away from the technology world for a bit.  Not to say I didn't check my email or read me some Facebook (because you need something to do in the bathroom, right??).  But while on vacation, I try to avoid that kind of stuff as much as possible.  

I know so many people who will constantly be checking their phone or computers, trying to stay caught up on work or even their internet social life...becoming absorbed in an alternate world than the one they are actually living in.  It baffles me.  After all, isn't that the point of a vacation?  To step away from it all and recharge?  To experience something new, spend time with your loved ones, and enjoy life?  

I am grateful that neither B or I have the need to be constantly "connected." I am especially glad that he is able to cut off all the needs and stresses of work and actually vacation.  It seems to be a disappearing art.....

What do you think?  Is there an alternate point to it I just don't understand?  A reason to always be reachable, involved, and connected?

And not to be too heavy...here are some random outfit shots from over the last month.  Each of these i am wear something that is at least 5 years old.  Classics that I love.  What are your go-to classic wardeobe staples?

Here is my favorite summertime uniform...a dress and sandals.  It just doesn't get any easier.  This was for Back to School Night.  I got this dress like 6 years ago and I still wear it all the time.  A sheath dress in a casual neutral fabric....perfect for all sorts of occasions and a classic.


I wore this to my monthly wine tasting.  These pants are old too....in fact, I wore them on my honeymoon!  But so so comfy and classic.  I love my white pants!


And this was for a date night for B and I...just dinner and drinks.  The skirt is another 5+ year old piece.    But it is still doable...I actually forgot I had it.  It was part of my former working wardrobe and it always seems strange to me to wear something I wore for work in real life, but I am slowly getting better at blending the two wardrobes.


And you may notice the accessories in the last 2 photos are the same...I have been obsessed with these lately.  I actually won the clutch in a giveaway (it is JCrew) from another blog I read...

http://www.gigisgoneshopping.com/ 

Since I avoid the malls and stores as much as possible, her kind of blog is right up my alley.  It helps being able to see what the clothes look like on actual people.  If you are an avid Internet shopper like me, you should check it out.

The watch is a Target knock-off of a Marc Jacobs watch, and the bracelet is another Target purchase. I was liking the spikes.  Makes me feel bad-ass.


And finally....speaking of back to school.  These little guys have started Pre-K4.  They are gone all day and I miss them like crazy.


Pin It

Wednesday, August 28, 2013

Sweet and Spicy Shrimp, a.k.a. The Best Shrimp You Will Ever Eat

I am a little weird/picky about shrimp.  I mean, I like it, but mostly when it is cold...and a little tougher, you know.....meat-like?  Warm shrimp usually freaks me out texture-wise and so I avoid it.  Except for this dish.

And truth be told, I have never met a soul who doesn't like this shrimp.  Even my pickiest little one (J, of course) will willingly eat this.


It is soooooooo great for a main dish, a side, or as an appetizer at a party.  And quick and easy.  What's not to love?

Sweet and Spicy Shrimp
Makes 6 servings
145 cals / 3g fat / 4g carbs / 24g protein

2 TB olive oil
1/4 cup brown sugar
1 lemon
1/2 cup fresh mint
1-2 tsp cayenne pepper (or to taste, depending on how spicy you like things)
1 tsp salt
1/2 tsp black pepper
2 lbs large shrimp, peeled, deveined, uncooked

1.  In the bowl of a food processor or blender, combine olive oil, brown sugar, zest and juice from one lemon, mint leaves, cayenne pepper, salt, and pepper.  Pulse until blended.  Rinse and dry shrimp and place in shallow dish or ziploc bag with sauce.  Allow to marinate at least 30 minutes, or overnight.

2.  Remove shrimp from marinade and cook over medium-high heat on the grill, about 2-3 minutes per side.  Or, alternatively, cook under high broiler until shrimp is done, about 3 minutes per side.  Serve warm or at room temp.  Garnish with fresh mint, if desired.


Pin It

Sunday, August 25, 2013

Cold Cucumber Soup

Ugh.  I have so many "summertime" recipe ideas to share and I am quickly running out of summer-time to share them.  But this is one I had to bump up to the top of the list.  


I am a big big fan of cold soups, and this one is probably my favorite.  It is full of garden-fresh goodness, takes all of 5 minutes to make, keeps well in the fridge, and is so so perfect for those steamy summer nights. 

Plus, at 30 cals per serving you can totally justify that milkshake you had B run out to get you at 9pm...or something like that.

Are you a cold soup fan?

Cold Cucumber Soup
Makes 8 servings
30 cals / 0g fat / 4g carbs / 3G protein

3-4 cucumbers
4-6 green onions
2 cloves garlic
1/3 cup fresh herbs plus a little extra for garnish, if desired (I like a mix of mint and parsley.  Cilantro, basil, and tarragon also work well)
1/2 lemon
1 cup vegetable broth
1 cup fat-free Greek yogurt
Salt and Pepper
Olive Oil for garnish, optional

1.  Peel and seed cucumbers.  Roughly chop.  Coarsely chop herbs and green parts of onions.

2.  Add chopped cucumber, green onion, chopped herbs, garlic cloves, juice from 1/2 lemon, and broth to blender or food processor and blend until smooth.  Add yogurt and purée until smooth and creamy.  Add salt and pepper to taste, blending to mix.  Refrigerate until cold, at least one hour and up to 3 days.  

Serve cold.  Garnish with extra chopped herbs and a few dots of olive oil, if desired.


Pin It

Wednesday, August 21, 2013

Fresh Mint Chocolate Chip Ice Cream


So today I was talking to myself (right....like I'm the only crazy one?), and I was saying "Ashli, seriously, enough blathering on about yourself and juice.  It is time to talk about real food."

But then the dilemma came...what do I share?  My latest kale concoction that even the kids willingly eat?  The best shrimp on the planet?  My casual dinner party meal?  And then I realized...DUH.  I need to share some real food...like ice cream.  Which is so real, I fully believe I could subsist on it alone. And so, I am back from droning on and on about juicing with this amazing ice cream recipe.

I made this using fresh mint, so if you are expecting the brightly green artificially flavored stuff (which..who am I kidding...is also delicious), then you need to look elsewhere.  The fresh mint gives this a pale off-white/barely tinted green color, and the mint is herbal tasting.  But it is still light, refreshing, and delicious (obvi).

Also, I am adding instructions for my new favorite way of adding chocolate to ice cream.  Feel free to skip this step and just add in some finely chopped chocolate or mini chocolate chips.

Fresh Mint Chocolate Chip Ice Cream
Makes ~1 quart

3 cups Half and Half
1 cup sugar
1 - 1 1/2 large bunch fresh mint (about 2 cups leaves roughly chopped)
1 cup heavy cream
5 egg yolks
Pinch of salt
4 oz dark or bittersweet chocolate

1.  Roughly chop the mint leaves.  Combine about 2 cups mint with half and half, sugar, and pinch of salt in heavy-bottomed sauce pan.  Heat over medium heat, stirring occasionally, until sugar is dissolved and mixture is steaming and just beginning to bubble.  Remove from heat and let mint steep for at least 30 min, up to 2 hours.  Strain mixture into a large bowl, pressing on mint to get as much moisture out as possible.  Discard mint leaves.

2.  Whisk in egg yolks and cream until fully mixed.  Return to saucepan and heat over medium heat until mixture begins to thicken slightly and coats the back of your spoon (about 7 minutes for me).  Do not let this boil.  Remove from heat and pour through a strainer back into the bowl (or get a new bowl if you aren't as lazy as me and don't mind doing dishes).  Refrigerate until cold, 2-3 hours, or overnight.

3.  Pour mixture into ice cream maker and freeze according to directions.  While ice cream is churning, finely chop chocolate and melt in the microwave, stirring every 30 seconds or so to make sure it is smooth.  Let melted chocolate sit 2-3 minutes to cool slightly (you can always re-warm if you need to). When ice cream is pretty much frozen (soft-serve consistency) using a spoon, slowly drizzle chocolate in thin lines over the top of the ice cream.  Allow to mix in, then add more to the top.  Continue until chocolate is gone (chocolate will harden and be broken into tiny bits as the ice cream mixes).  Or I guess your could just mix in the chopped chocolate or the chips...but you know, why make things easy??  Keep in the freezer.  

Or eat it all and tell your family about how good it was later.  Oh...no, that would never happen here.


Pin It

Monday, August 19, 2013

The 5-Day Juice Fast, My Summary

So, having gone through 6.7 days of juice fasting, I thought I would share a little summary of my pros and cons.  You can read about my actual experiences here and here.

Cons:
- Obviously the hunger.  Made even worse by the fact that I still had to feed my kids and then sit there and watch them eat.  Torture at times.
- The mess.  Juicing is messsssssyyyyyy.  Aside from all the prep you need to do for the produce, the juicer itself constantly needs cleaning.  And it is kind of a pain.  Not to mention the tiny bits of veggie pulp that go flying everywhere that I am still finding.  
- Those days when you feel like absolute hell....tired, weak, grumpy, exhausted.  Ugh.  Combined with hunger?  Kill me now, please.
- The cost.  You need a ton of produce.  Which can get really expensive.  Plus a juicer, which isn't exactly cheap.
- Not conducive to a social life.  I mean, you can't really go out for dinner and bring your juice...you know?

Pros:
- The weight loss factor.  For me (because I am vain), this is the biggest pro.  My starting weight was 147.  My ending weight was 141.8. However, I think a good portion of this was water weight....I definitely have added some back.  And I would not consider this a permanent or sustainable method of weight loss, unless you are prepared to make some serious lifestyle changes when you are done.
- The health factor.  I mean, you are getting super doses of all those veggie and fruit vitamins and nutrients.  All while avoiding the crap food you normally consume.  

So...for the future....

My takeaways from this...I did like the idea of getting more fruit and veggie nutrients, so i do see myself adding in more vegetarian meals.  And it was nice to kind of re-set my eating and drinking habits.  There were several juices that I did like, so I do think I will sub one of those for a meal or snack, especially after a booze/sugar/processed food binge.

A new (to me) breakfast...apples and blueberries sautéed in coconut oil with a little cinnamon.

As to whether or not I would attempt another fast...I have no major health or weight issues, so I don't really need one.  And I am thinking I didn't experience the same benefits as people who actually needed one.  I guess I am not sure....maybe?  But definitely not any time soon.  I am enjoying masticating way too much to try it again now.

Another juicing-inspired meal...pineapple, tomatoes, and 1/2 a baked sweet potato with salt, cumin, smoked paprika, and chipotle chili powder.
Pin It

Wednesday, August 14, 2013

The Five-Day Juice Fast, My Juicing Diary, continued...Days 4-5 (+6-7??)

Continuation from here....

Day 4:
Seriously.... I feel pretty good. Almost like I am buzzing with energy.  I even woke up this way, almost like...dare I say it...I had turned into a morning person.  I still had my morning cup of coffee, but only because I wanted it and I enjoy it...not because I needed it.  I now see what all the hooplah is about.  Also, I can tell my stomach bloat has definitely gone down.  My gut fat roll is no longer hanging over my shorts quite the way it was.

Yes, I am still a bit hungry.  And yes, those chips in the pantry do look good, but not as good as before.  Maybe it has something to do with how good I feel, maybe I really have flushed out the toxins (still skeptical on this part), but I think it more so has to do with how proud I feel. Like I can't believe I stuck with this crazy plan and actually haven't chewed anything for 4 whole days (well, except for that one moment of weakness with the taffy, but we won't count that).  Proud that I didn't give up, and proud that I no longer feel the need to ruin this accomplishment (or whatever you want to call it).

The makings of "lunch."  Look at all that vegetabley goodness.

It is weird to me to think that tomorrow is supposed to be the last day....I am contemplating going to a 7-day fast instead.  I think I will make it a last minute decision tomorrow, depending on how I feel and how much longer I want to avoid using my teeth.

Day 5:
I did it!!!  I made it to day 5, my goal date.  Woot!  Feeling decent.  I would be feeling a lot better if my day hadn't started off with an orange and red cabbage drink.  It is the equivalent of drinking liquified hot rotting garbage.  I couldn't finish it.  And now I feel like I am going to vom.  Not good at all.  On the bright side, my stomach looks so much better....much flatter, so I've got that going for me.  Oh, and B informed me that he lost 11 lbs.  What a dick.

We decided since we are starting to notice results weight-wise, and feeling pretty good, we are going to extend to a 7-day fast.  We hit the grocery last night and stocked up on produce.  Bring on 2 more days!

Day 6:
MAN DOWN, MAN DOWN!!  We have a man down!

The meal that did him in....

This morning, the 7-day fast and I lost B to the lure of eggs and toast.  Truthfully, I can't blame him.  After last nights torture of watching the kids eat tacos and garlic creamed corn, I almost broke myself.  And B didn't really need to lose any weight to begin with...I am sure he wasn't getting enough calories, and I know he was concerned about protein and muscle loss.  So I don't blame him too much.  

I plan on sticking with this today (the day is almost half over, I can do this!), but I am not sure I will be able to fully complete tomorrow.  I am tired of not eating, and I am bored with this juicing adventure.  We will see....

Day 7:
Breakfast, check.  Lunch...no problem.  Afternoon time...and I am done.  I am hungry.  And I can no longer resist those wasabi almonds.  And all I can think about is a baked sweet potato (wierd).  So....almost 7 days.  I might still have a juice for dinner and dessert, but I guess I am no longer juice-fasting.  The end.

Just kidding, I am going to follow up with a summary.


Pin It

Sunday, August 11, 2013

The 5-Day Juice Fast, My Juicing Diary, Days 1-3

Remember that one time you decided to watch the film Fat, Sick, and Nearly Dead, and then ended up convinced that you too needed to purchase a juicer and do a juice cleanse?  No?  I do.

So...we have this habit where pretty much every single night, B and I put the kids to bed and then retire to the couch to watch t.v.  Lately, we have been on a documentary kick, and one of those was the above show (Warning: do not watch unless you want to end up convinced you need to purchase a juicer and do your own juice cleanse).

What can I say...I am very susceptible to the power of suggestion.  This is why I have to mute commercials.

Anyways, I bought this juicer from Kohls.com (on super mega sale, plus a 30% off coupon so I wasn't tooooo invested in this hair-brained scheme).  And B and I decided to do a 5-Day Reboot, where we consume nothing but juices for 5 straight days.  Oh, and coffee, because I am not giving up coffee.  Nor do I have any plans to EVER give up coffee.  Coffee is the life-blood of champions. But I drink it black...so no sugar or dairy, I mean....it is vegan so it can't be too unhealthy, right?

Before starting the official fast, I was supposed to start eliminating alcohol, grains, meat, dairy, and processed foods from my diet.  I did nothing of the sort.  In fact, leading up to starting this, I was even more unhealthy than usual.  Starting this totally cold-turkey and hoping my food detox isn't terrible.

Here is my captain's log of this crazy plan......days 1-3, cause this is getting loooonnnng.

Day 1:
Weight:  147 lbs...yikes!
So, first off...It was a big mistake not to get rid of all those salty and sweet processed foods in the pantry (helloooo salt water taffy and chili cheese fritos).  But I do need to feed the kids too.  And I need to learn to resist this junk better, so I plan on exercising some will-power.

Desperation mode....I just put a piece of taffy in my mouth.  But I chewed it a few times then spit it out....I am still good, right?  Also, I definitely stuck my face in that bag of fritos and just inhaled.  But I decided they smelled gross...so we're o.k.

Day 1 lunch...a mean green (kale, celery, cucumber, apple, lemon, ginger)

Overall, I felt decent, but by the end of the afternoon I did feel a little tired and cranky.  I also had some mild-medium headaches throughout the day.  I discovered that if my head was hurting, drinking a juice helped it go away.  I think I will just drink more juices on the upcoming days if my head starts hurting again.  My favorite part of the day was dessert/nighttime snack.  Holy crap was that delicious (grapes, blueberries, mint).  I think I can make it through another day with something like that to look forward to.

Day 2:
I woke up feeling ok, but still tired and groggy.  Perhaps it is the juice effects, or perhaps it is the getting woken up in the middle of the night by a screaming L who has decided she is afraid of sleeping (seriously, she is slowly killing me).  And this is why I refuse to give up coffee.

Here is where today totally sucked...I am huuuuunnngggry.  I mean the "my kids are starting to look tasty" kind of hungry.  Stomach growling licking the insides of my juice glasses hungry.  Tomorrow, more tea and hot lemon water is the plan.  Supposedly the first 3 days are the hardest, and then the magical juicing power kicks in and you feel all sorts of wonderful and energized. We will see.

Day 3:
According to some of the reading I did, this is supposedly the worst day.  I concur.  I woke up feeling like shiiiiit.  Queasy, shaky, headache, tired, like i am in a fog and can't think straight....blahhhhh.  The upside is I am feeling so gross that the thought of a cheeseburger (or food in general) makes my stomach turn.  Also, this mornings breakfast juice was a beet concoction, so that probably isn't helping. I don't like beets, and juicing them does not make them any better.  Yuck!

Mmmnnnnnnn.....beet-ey.  Like drinking a big glass of dirt.

As the afternoon went on, I felt a little better, but still definitely tired and a little cranky.  I am planning on taking the kids to the pool.  Thank god they have lifeguards there, because I don't think I have the energy to jump in and save them, if needed.  Another negative here is that i have this constant "scummy" feeling in my mouth...like no amount of toothbrush scrubbing will clean these teeth.

On the bright side, I do feel considerably less bloated, so I might just not automatically reach for my matronly one-piece....gasp! And dessert tonight is the blueberry-grape juice, woohoo!


To be continued for days 4-5, plus my final summary....

Pin It

Friday, August 9, 2013

Buffalo Bleu Cheese Turkey Meatballs


I made these the other week when Brett was out of town.  I thought getting the kids to eat these would be a struggle, but they literally devoured them.  All while continuously praising me and thanking me for making them.  These got comments such as:

"Oh yum. Thank you for making these, Mom.  You should make these again."
"Mom, these are so good.  You should be a chef, Mom.  You should be a chef at a restaurant."
"Mom, maybe you can make these for our birthday party.  And for daddy."

It was ridiculously funny.  And all over meatballs.  Who would have thoughit?  Either they really really loved these, or they were just trying to suck up so I would let them watch a movie before bed.  A night without fighting to get them to eat?  I will take it either way.

I served these with a low-fat, low-cal bleu cheese dressing for dipping (Bolthouse Farms...amazing stuff).  Also, I am so proud, my kids have started to actually like  bleu cheese.  If you don't, I guess you could skip it (what a shame). Or swap for cheddar cheese and ranch dip.

And I made these for dinner, but they would also make a great appetizer for a party or pot-luck.

Buffalo Bleu Cheese Turkey Meatballs
Makes 6 servings (4-5 balls per serving)
200 cals / 8g fat / 7g carbs / 22g protein

16 - 20 oz lean ground turkey
1/4 red onion
1 stalk celery
1 egg
3/4 cup bread crumbs
1/3 cup buffalo sauce (I like Franks best)
1 tsp garlic powder
1/2 tsp salt
1/2 tsp black pepper
1/3 cup reduced-fat crumbled bleu cheese (optional, or swap for cheddar)
Bleu cheese or Ranch dressing for dipping (optional)

1.  Heat oven to 425.  Spray a large baking sheet with cooking spray.  Mince onion and celery.  

2.  Combine turkey with minced onion, celery, egg, breadcrumbs, buffalo sauce, garlic powder, cheese, salt and pepper in a bowl.  Gently mix (use your hands, it is easiest) until combined.  Form into balls, about 2 TB per ball.  Place each ball on baking sheet. And bake until cooked through, about 30 minutes.  Serving with dressing on the side for dipping.


Pin It

Wednesday, August 7, 2013

Chicken Schwarma Pitas and the Time I Had to Cut My Pants Off

Once, a long long time ago I was at work.  I was wearing a pair of fitted cropped pants with a hidden side zipper (you know the kind I am talking about?) and had started my day by drinking two large coffees.  So naturally, I had to pee.  I got to the stall and encountered a problem.....my zipper was seriously stuck!  I struggled for a good five minutes trying to get it down, to no avail.  By this time, I reallllly needed to go.  So I ran down the hall to enlist the help of my friends in the lab.  

3 people tried with no success.  One of the men even grabbed a pair of pliers and was trying to get the zipper down (you want akward? Imagine having to pee so bad you have a male co-worker try to wrench your pants off with a pair of pliers).  At this point, I couldn't hold it any longer...it was starting to come out.  I did the only thing I could, I grabbed a pair of scissors, ran to the bathroom, and cut my pants off, emergency room-style.  I had never felt relief so sweet.  

Thankfully one of my friends had her dry cleaning in her car, and just so happened to have a pair of black dress pants in my size (spending the day in dirty pants was much better than spending the day in pants held together with duct tape...thanks Jeri!).

The moral of this story....those hidden side zippers are the worst.  And it never hurts to have a back up pair of pants.  

You know what else?  It never hurts to have yet another simple chicken meal.  I feel like I am going on overkill with these, but we eat a TON of chicken, so variety is great.  I originally got this recipe from one of my lady magazines...but I can't remember which one.  Maybe Woman's Day....maybe Good Housekeeping.  

Either way, these are quick and easy and full of flavor, and they make great lunches the next day.  In the summer I grill the chicken, in the winter I just cook it in a pan with a little cooking spray.  Both ways work just fine. 

Also...look at the nutritional info...go ahead, have 2.  These are incredibly healthy!


Chicken Schwarma Pitas
Makes 8 Servings
190 cals / 4 g fat / 20g carbs / 19g protein

1 - 1 1/2 lb chicken breast, thinly sliced
1/4 cup plus 1/2 cup plain fat-free Greek yogurt
6 cloves garlic
1 lemon
1 tsp cumin
1/2 tsp crushed red pepper
2 tsp salt
1 tsp pepper
1/4 cup tahini
4 whole wheat pita pockets
cucumber, lettuce, tomato, red onion, feta for garnish (all are optional)

1.  Mince garlic.  Trim fat from chicken.

2. Combine 4 cloves minced garlic with 1/4 cup yogurt, zest from 1 lemon, juice from 1/2 lemon, crushed red pepper, cumin, 1 tsp salt, and 1/2 tsp pepper.  Coat chicken in sauce and allow to set at room temp for 20-30 min.

3.  While chicken is marinating....chop/cut any veggies you are using for garnish, make tahini sauce:  mix 1/2 cup yogurt with remaining 2 minced cloves of garlic, juice from remaining lemon half, 1 tsp salt, 1/2 tsp pepper, and tahini.  Mix well and set aside.  Cut pitas in half and warm, if you want.

4.  Cook chicken on grill (or in pan) until cooked through, about 3-4 min per side.  Slice into thin strips, and serve by filling a pita half with chicken, any of the veggies you want, and a good serving of the sauce.


Pin It

Monday, August 5, 2013

Jamaican Grilled Chicken and Plantains

This is one of my all time favorite summer meals, originating from the geniuses at Epicurious.


It is quick, easy, and delicious.  And who doesn't need another simple chicken recipe in their arsenal...right?

Also, my sister-in-law is from Jamaica.  And I made this for her once.  And she liked it...so it is at least a little bit authentic.

Jamaican Grilled Chicken and Plantains
Makes 6 Servings
455 cals / 6g fat / 68g carbs / 28g protein

1/4 cup molasses
1/4 cup red wine vinegar
2 TB tomato paste
1/2 small onion
3 cloves garlic
2 tsp fresh thyme leaves
1/2 tsp cayenne pepper (this will be spicy, add less if you don't want the heat)
1/2 tsp ground allspice
1/2 tsp salt
6 chicken breasts (about 1 1/2 lbs...mine comes with 3 in the pack and I slice them in half horizontally to get 6)
6 large plantains (make sure they are ripe...slightly soft and blackened peels)
1 TB olive oil
salt and pepper

1.  In a blender, combine the molasses, vinegar, tomato paste, onion, garlic, thyme, cayenne, allspice, and salt.  Process until smooth (I like to leave mine a little chunky, but it works both ways).

2.  Trim the chicken breasts, then season both sides with salt and pepper.  Place in a shallow dish and coat with enough sauce to coat.  You should have 1/2 to 1/3 of the sauce left over.  Let chicken sit at room temp to marinate for 20-30 minutes.

3.  Peel and slice the plantains on a diagonal about 1/2 inch thick.  Brush each side lightly with olive oil and season generously with salt and pepper.

4.  Grill chicken and plantains until done.  Chicken will take about 5-8 minutes per side and plantains will take about 3-6 minutes per side.  Serve with extra sauce on the side.


Pin It